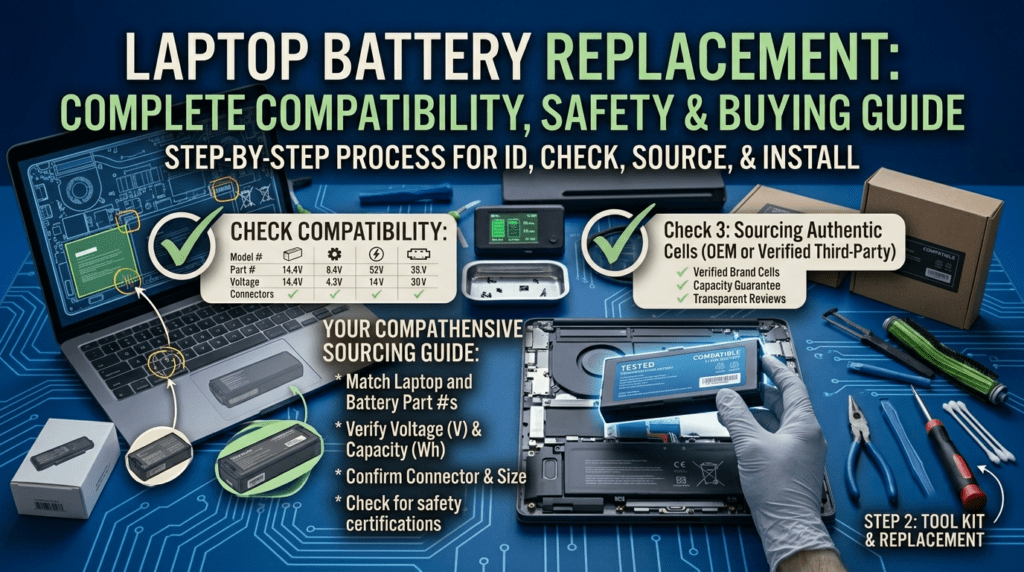
Laptop Battery Replacement: The Complete 2026 Guide
A laptop battery usually lasts between two and five years, or 300 and 500 charge cycles, whichever comes first. You have two options when it fails: replace the battery or replace the laptop. A battery replacement usually takes 15 to 45 minutes and costs between $30 and $150 for most cars less than 6 or 7 years old. A new laptop costs a small portion of that.
This guide goes over the whole end-to-end process. Each section connects to a more thorough paper if you’re interested in learning more about that subject. You’ve come to the right place if your laptop only functions while plugged in or if it dies at 40%.
1. Is Your Battery Actually Dying? (The Warning Signs)
A replacement battery isn’t always necessary for power issues. Make sure the problem is truly the battery—or something else—before you spend any money.
7 Signs Your Battery Needs Replacing
| Symptom | What It Means |
|---|---|
| Laptop dies at 30%, 40%, or 50% | The battery can no longer hold voltage under load. The percentage reading is wrong because the BMS lost calibration — or the cells are worn out. |
| Runtime dropped below 2 hours | Most laptops shipped with 4–8 hours. If you’re getting under 2 hours doing the same tasks, capacity has degraded past the point where it’s useful. |
| Only works when plugged in | The battery can’t deliver current anymore. It’s effectively dead — even if Windows still “sees” it. |
| “Plugged in, not charging” | Could be a driver issue, a charge threshold setting, or a failed battery. We’ll troubleshoot this in section 7. |
| Case is bulging, trackpad is lifted | The battery is swollen — a serious safety hazard. Stop using the laptop immediately. Skip to section 10. |
| Battery report shows under 70% of design capacity | You’re past the point where the battery is pulling its weight. Time to replace. |
| Laptop feels hot even at idle | A degraded battery generates more heat during charging and discharging. Combined with short runtime, this is a clear signal. |
How to Generate a Battery Report (Windows)
This takes 30 seconds and gives you hard numbers instead of guesswork:
- Open Command Prompt as Administrator (right-click Start → Command Prompt (Admin) or Terminal (Admin)).
- Type
powercfg /batteryreportand press Enter. - It’ll save an HTML file — the path is shown in the output. Open it in any browser.
Scroll to “Installed batteries.” Compare Design Capacity against Full Charge Capacity. If Full Charge is under 70% of Design, you’re due. If it’s under 50%, you’re overdue.
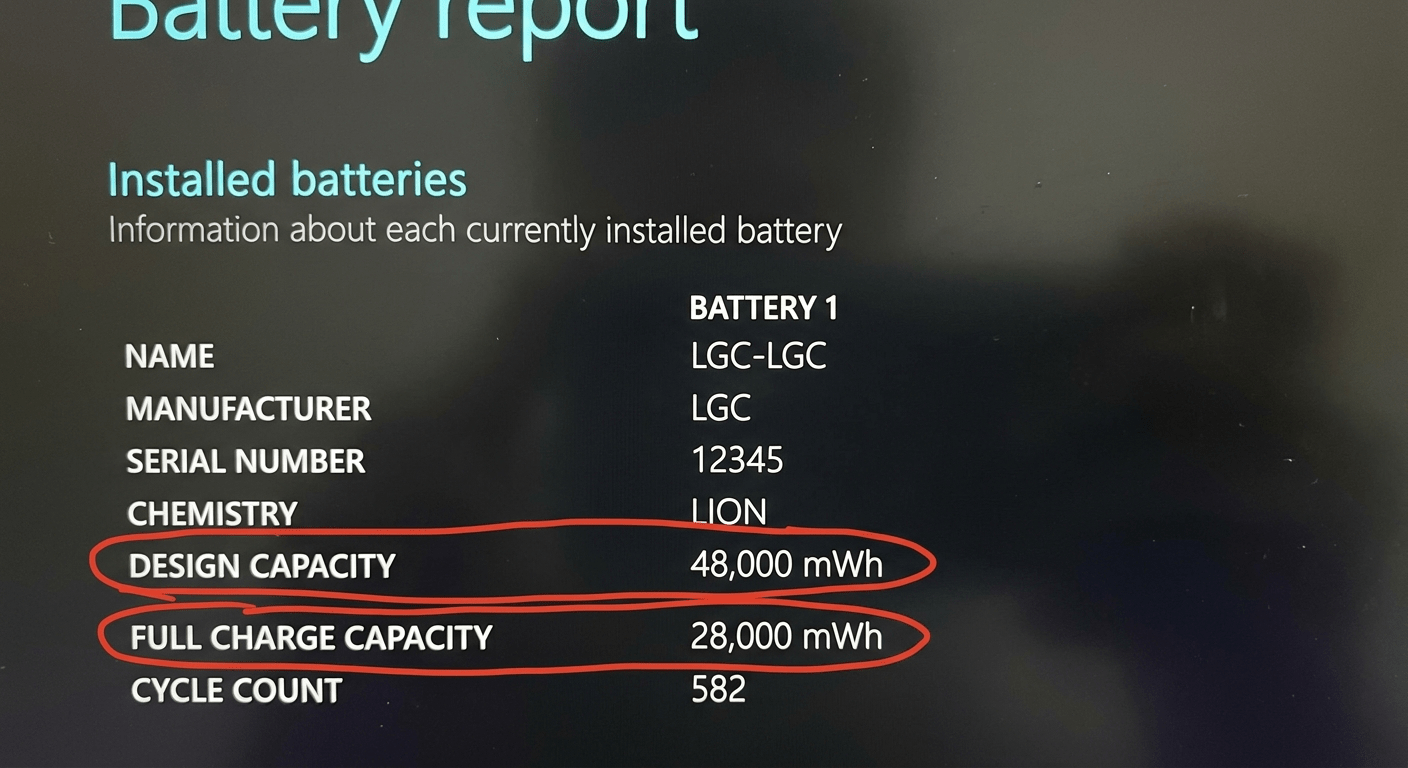
I’ve seen batteries reporting 85% health that still shut down randomly. The report is a snapshot — real-world behavior matters more. If the numbers say “fine” but the laptop dies at 35% every afternoon, trust the laptop, not the report.
→ For a full breakdown of battery lifespan, charge cycles, and when to replace, read our guide: How Long Does a Laptop Battery Last? Lifespan, Cycles & Warning Signs.
2. Find Your Battery Model (Without Buying the Wrong One)
The biggest error individuals commit is purchasing a battery only on the basis of the laptop model. Three different batteries are available for the Dell Inspiron 15. It’s the same for practically every other line, including the HP Pavilion and Lenovo Think Pad. You’re playing a game of chance if you match by laptop model rather than battery part number.
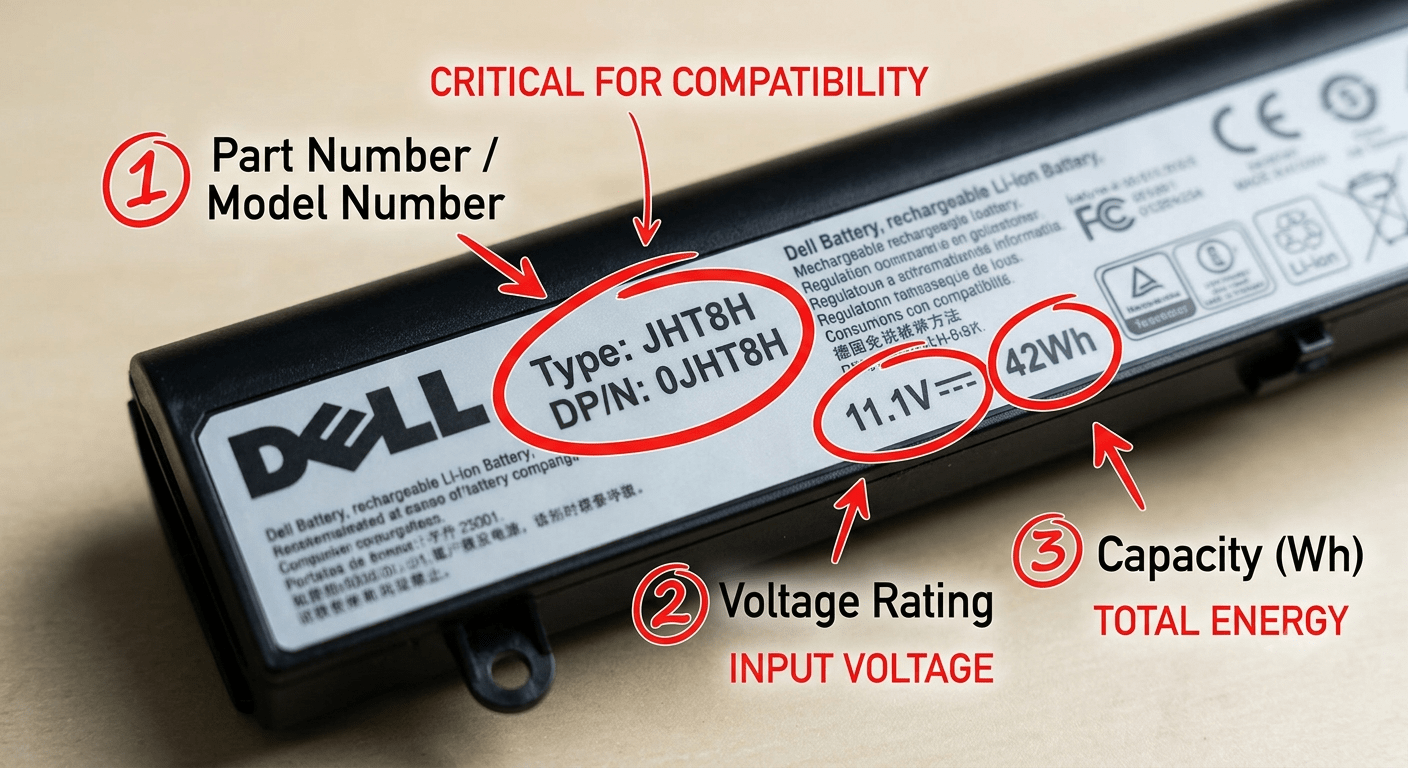
The Golden Rule: Match the Part Number
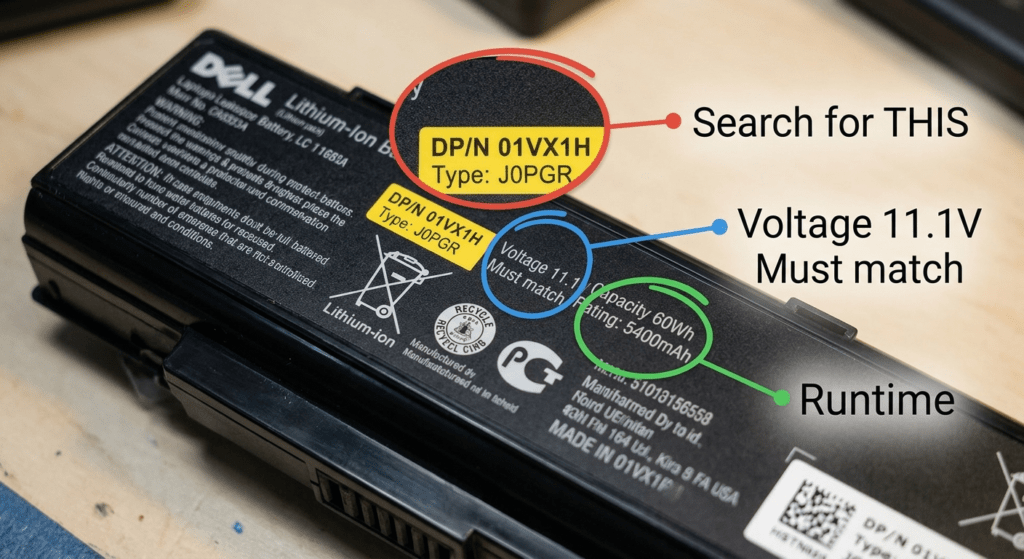
Every laptop battery has a part number printed on it. It’s usually on a white sticker on the battery itself. You might need to remove the battery to read it — if it’s external, that’s a 5-second job. If it’s internal, you’ll need to open the bottom panel (but you’d need to do that anyway to replace it).
Once you have that part number, your search goes from “battery for Dell Inspiron” (vague, risky) to “01AV493” (exact, safe).
Three Ways to Find Your Battery Part Number
| Method | Works For | Reliability |
|---|---|---|
| Read the label on the battery itself | External batteries (easy); internal batteries (requires opening case) | ★★★★★ — The only 100% reliable method |
| Windows system tools (msinfo32, powercfg) | Many laptops — but not all report the part number | ★★★ — Sometimes shows it, sometimes doesn’t |
| Look up by laptop model on manufacturer site | All laptops — but requires cross-referencing | ★★★ — Good for narrowing down, then verify with method 1 |
Brand-Specific Part Number Formats
Different brands use different formats. Here’s what to look for:
| Brand | Example Part Number | Format Pattern |
|---|---|---|
| Dell | M5Y1K, G91J0, 4GVMP | 5-character alphanumeric, or 312-xxxx |
| HP | 919680-851, HT03XL | 6-digit + 3-digit suffix, or letter+number combo |
| Lenovo | 01AV423, L16M2PB2 | 01AVxxx or LxxMxxxx format |
| ASUS | C31N2313, B31N2015 | C31Nxxxx (3-cell) or B31Nxxxx (older 3-cell) |
| Acer | KT.0040G.002 | KT.xxxxx.xxx format |
| Samsung | AA-PBZN4TP | AA-PBxx format |
I’ve seen too many people order the wrong battery because they searched “Inspiron 15 battery” instead of looking up the actual part number. One Inspiron 15 3000 series alone has at least four different battery configurations. The 20 seconds it takes to pull the battery and read the label saves you a return, a restocking hassle, and another week without a working laptop.
→ Step-by-step instructions (with brand-specific label photos) in our guide: How to Find the Correct Laptop Battery by Part Number.
3. Battery Specs Decoded: V, mAh, and Wh
You found your battery. Now you’re staring at numbers like “11.1V, 4400mAh, 48Wh.” What do they mean — and which one actually matters?
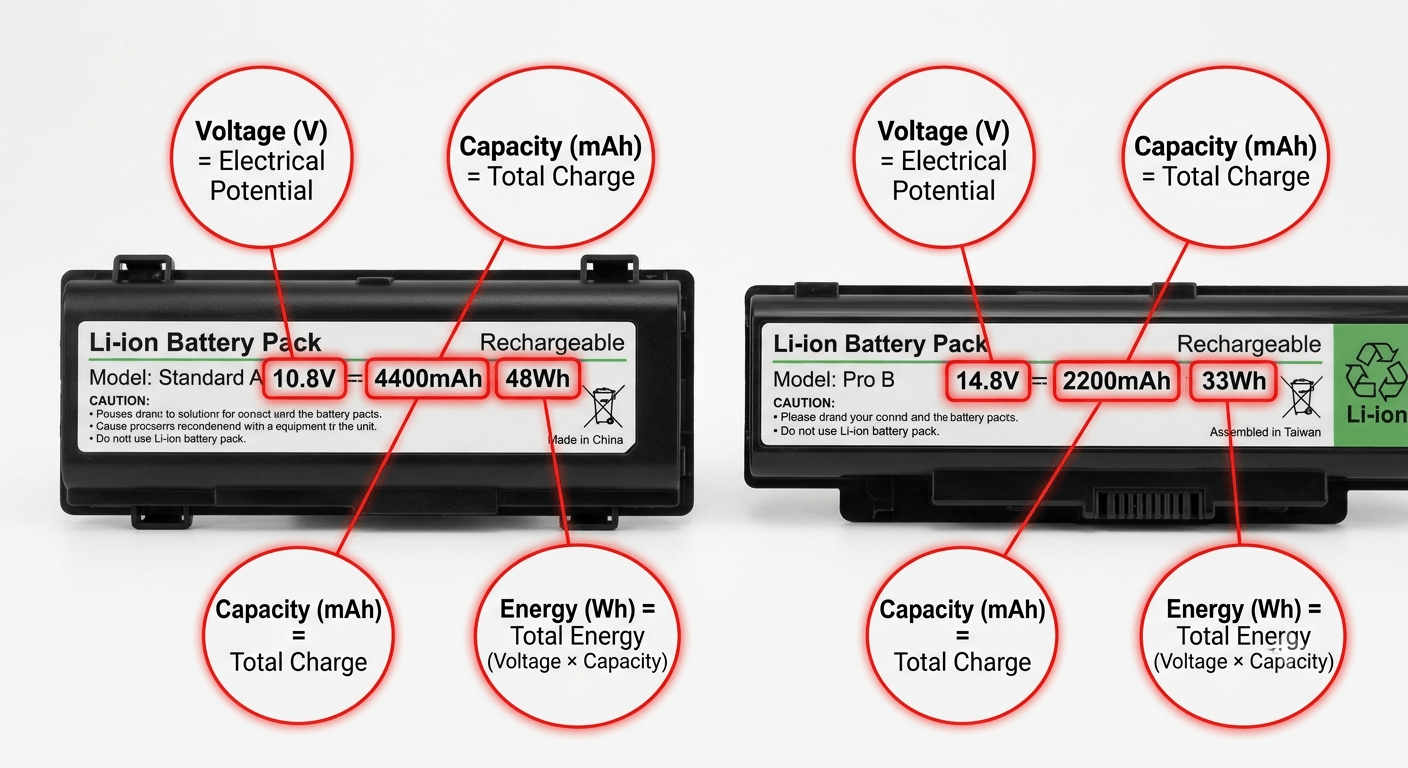
What Each Number Means (Plain English)
| Spec | What It Measures | Simple Analogy |
|---|---|---|
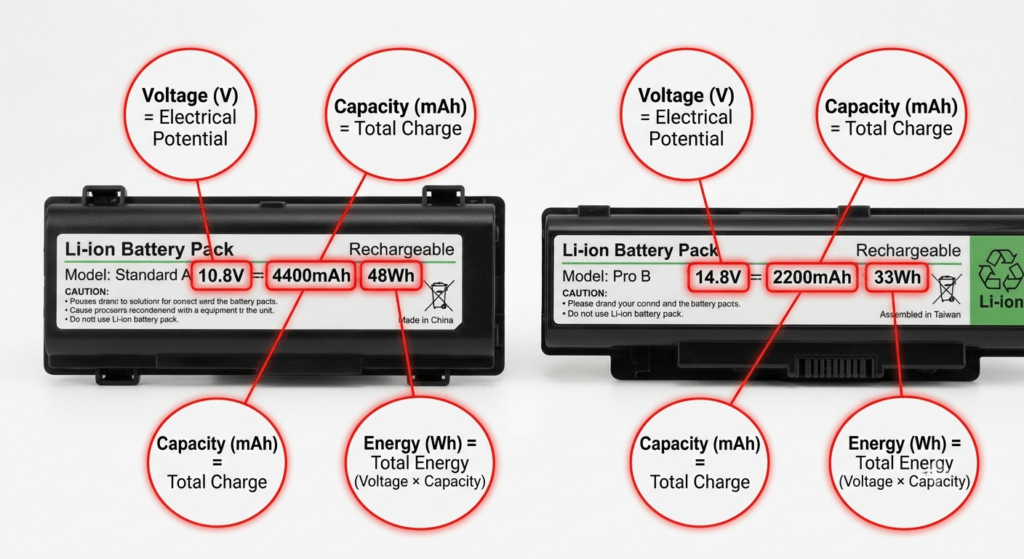
| V (Voltage) | Electrical “pressure” — must match your original | Water pressure in a pipe. Too much pressure and things break. Too little and nothing works. |
| mAh (Milliamp-hours) | How much electric charge the battery holds | Size of the fuel tank. But — and this part matters — only comparable if voltage is the same. |
| Wh (Watt-hours) | Total energy the battery stores — this is the number that matters | How far the car can drive on a full tank. This is the real comparison number. |
The Only Formula You Need
Wh = V × mAh ÷ 1000
Here’s why this matters in real life. Compare two batteries:
| Battery A | Battery B | |
|---|---|---|
| Voltage | 10.8V | 14.8V |
| Capacity | 4400mAh | 4400mAh |
| Actual Energy | 47.5Wh | 65.1Wh |
Same mAh. Totally different runtime. Battery B stores 37% more energy. If you compared by mAh alone, you’d think they were equal.
The takeaway: when comparing laptop batteries, compare Wh, not mAh. Voltage differences between laptop models make mAh comparisons meaningless. This is also why airlines limit batteries by Wh (100Wh max for carry-on), not by mAh.
Quick Reference: Cell Configurations
| Cells | Typical Voltage | Typical Wh Range | Found In |
|---|---|---|---|
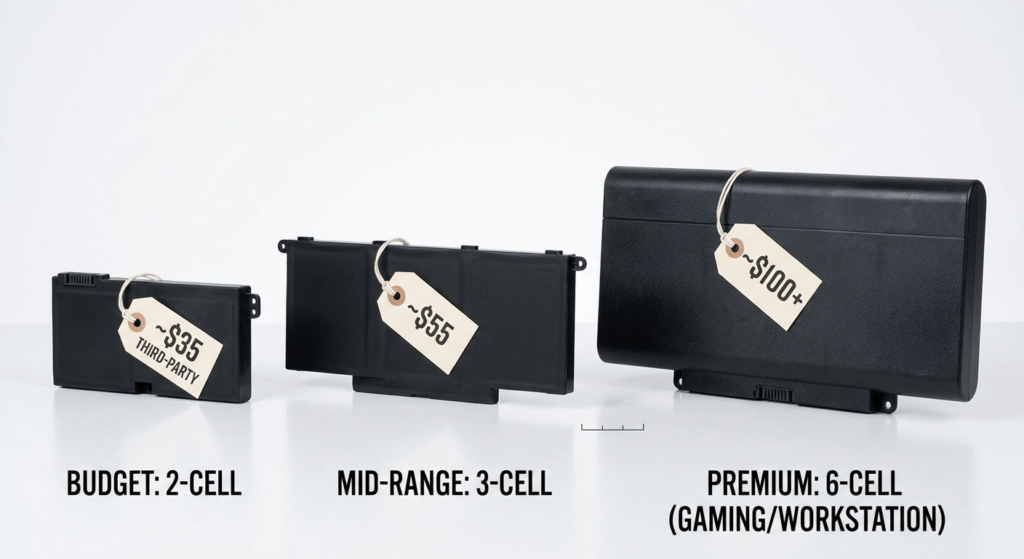
| 2-cell (2S) | 7.4V – 7.6V | 24 – 38 Wh | Thin-and-light ultrabooks |
| 3-cell (3S) | 10.8V – 11.55V | 36 – 56 Wh | Most mainstream laptops |
| 4-cell (4S) | 14.4V – 15.2V | 56 – 99 Wh | Gaming laptops, workstations |
| 6-cell+ | 10.8V – 11.1V | 60 – 90 Wh | Older extended batteries |
Voltage must match. A 10.8V and 11.1V battery are interchangeable (both are 3-cell Li-ion — the 0.3V difference is just how different manufacturers rate them). But you cannot put a 14.8V battery in a laptop designed for 11.1V — it won’t fit, and even if it did, it could damage the charging circuit.
Capacity (Wh) can be higher. If your original is 48Wh and you find a compatible 56Wh version with the same voltage and part number cross-reference, that’s a genuine upgrade — more runtime in the same physical space.
→ More detail on battery specs and how to compare two options: Laptop Battery Voltage, mAh & Wh Explained Simply.
4. OEM vs Aftermarket: Which One Should You Buy?
This is the question that trips up most buyers. OEM batteries cost more — sometimes twice as much. Aftermarket batteries are tempting at half the price. But the cheap option isn’t always cheaper in the long run.
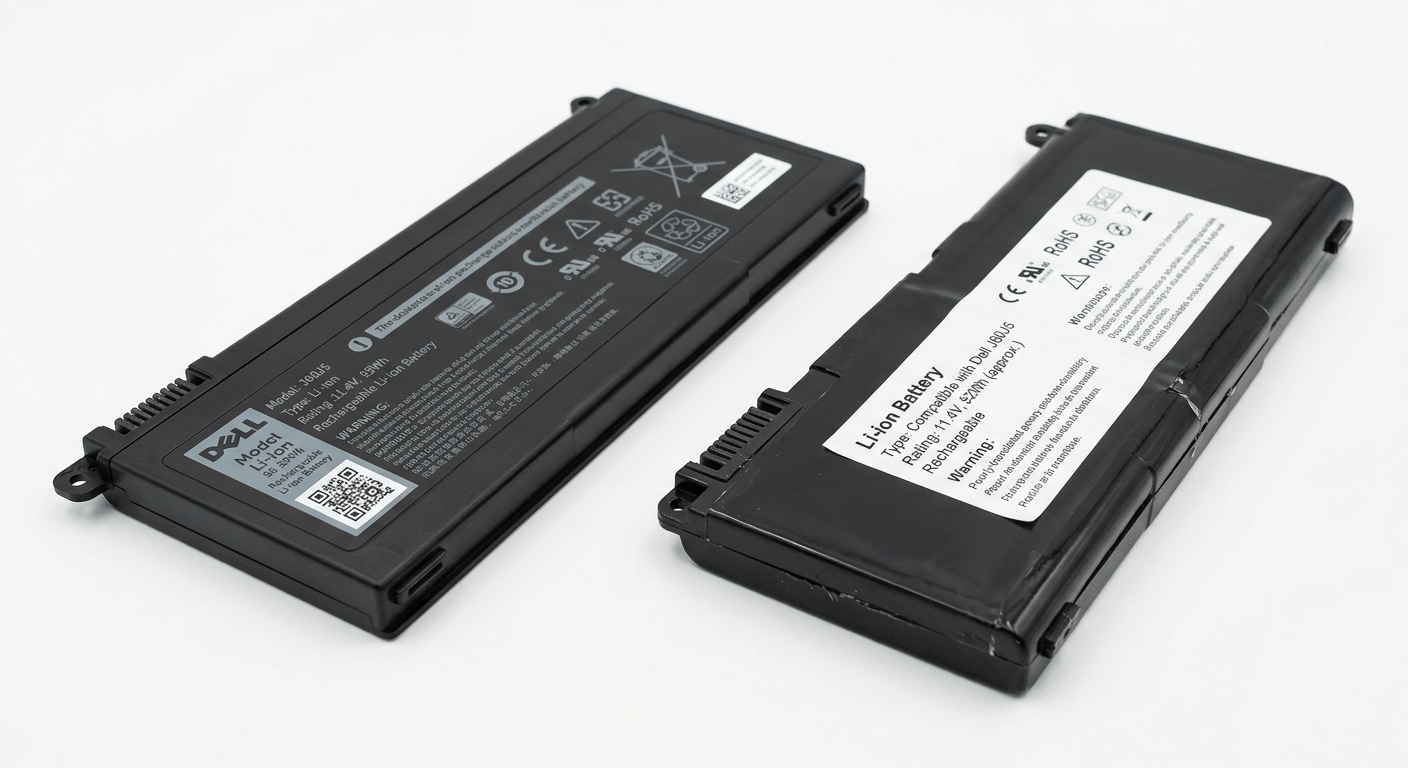
At a Glance
| OEM (Original) | Quality Aftermarket | Cheap No-Name | |
|---|---|---|---|
| Price | $55 – $170 | $30 – $80 | $15 – $35 |
| Lifespan | 2 – 3 years | 1.5 – 2 years | 6 months – 1 year |
| Warranty | 1 year manufacturer | 1 year (reputable brands) | 30–90 days, if at all |
| Safety Certs | UL, CE, FCC, UN 38.3 | CE, RoHS (varies by brand) | Often none — or fake labels |
| BMS Quality | Full protection (5 functions) | Usually 3–4 functions | Minimal or missing BMS |
| Capacity Accuracy | Delivers rated Wh | Usually close to rated | Often overstated by 20–40% |
What You’re Paying for With OEM
An OEM battery isn’t just a battery with a brand logo. It includes a Battery Management System (BMS) — a small circuit board inside the battery pack that monitors voltage, temperature, and current for every cell. It prevents overcharging, stops discharge before cell damage, balances cells so they wear evenly, and shuts everything down if it detects a short circuit or overheat condition.
Cheap aftermarket batteries often use a stripped-down BMS — or skip cell-level monitoring entirely. That’s the part you can’t see, and it’s the part that matters most for safety.
Safety Certifications to Look For
| Certification | What It Means |
|---|---|
| UL 2054 / UL 1642 | US safety standard for lithium batteries — tests for fire, short circuit, overcharge, crush, and impact |
| CE Marking | European conformity — the manufacturer declares the product meets EU safety requirements |
| FCC | US electromagnetic compatibility — the battery won’t interfere with other electronics |
| RoHS | Restriction of hazardous substances — no lead, mercury, or cadmium in the components |
| UN 38.3 | UN transportation safety standard — the battery passed altitude simulation, thermal, vibration, and shock tests |
If a listing doesn’t mention any of these, or the cert marks look blurry or misspelled on the label, walk away.
When to Go OEM vs When Aftermarket Is Fine
| Scenario | Recommendation |
|---|---|
| Laptop is under 2 years old, still under warranty | OEM — don’t risk voiding coverage |
| Daily driver for work / school | OEM or quality aftermarket with full BMS and 1-year warranty |
| Laptop is 5+ years old, casual use | Quality aftermarket is reasonable — OEM stock may be aged anyway |
| Budget is the #1 priority | Buy from a reputable brand with warranty — never the cheapest listing |
| Gaming laptop or workstation (high heat, high draw) | OEM strongly recommended — these push batteries harder |
I’ve opened enough cheap batteries to know what’s inside. The $18 eBay special might say “6600mAh” on the label — but the cells inside are 2200mAh generics with no brand markings. It’ll work for a few months, then the runtime drops off a cliff. The $45 option from a brand that lists its certifications and offers a real warranty? That one often lasts 18 months or more. The price difference isn’t as big as it looks once you factor in replacing the cheap one twice.
→ Full comparison with brand analysis and a decision checklist: OEM vs Aftermarket Laptop Batteries — Updated 2026 Guide.
5. What Does a Replacement Battery Cost?
Prices vary by brand, model tier, and whether you go OEM or aftermarket. Here’s what to expect in the US market, based on current pricing.
Price Ranges by Brand and Tier
| Brand | Laptop Tier | OEM Price | Quality Third-Party |
|---|---|---|---|
| Dell | Inspiron / Vostro (budget) | $55 – $90 | $30 – $55 |
| Latitude / Precision (business) | $70 – $170 | $40 – $100 | |
| Alienware / G-Series (gaming) | $90 – $170 | $50 – $120 | |
| HP | Pavilion / Envy (consumer) | $60 – $100 | $30 – $60 |
| EliteBook / ZBook (business) | $80 – $155 | $45 – $90 | |
| Spectre x360 (premium) | $70 – $120 | $40 – $75 | |
| Lenovo | IdeaPad / Yoga (consumer) | $60 – $90 | $30 – $60 |
| ThinkPad T/X Series (business) | $90 – $135 | $50 – $90 | |
| Legion (gaming) | $80 – $130 | $50 – $100 | |
| ASUS | VivoBook / ZenBook | $55 – $100 | $30 – $60 |
| ROG / TUF (gaming) | $80 – $130 | $45 – $90 |
These are market ranges — your specific model may be toward the lower or higher end depending on battery capacity (Wh) and availability.
DIY vs Professional Installation
| Option | Cost (Labor Only) | Best For |
|---|---|---|
| DIY (external battery) | $0 | Anyone comfortable sliding a latch — takes 30 seconds |
| DIY (internal, screw-mounted) | $0 + tools (~$15 one-time) | People comfortable with a screwdriver and basic disassembly |
| Professional repair shop | $40 – $100 | Glued-in batteries, swollen batteries, or anyone who’d rather not open their laptop |
The “Repair vs Replace” Rule
Here’s a simple way to decide whether to replace the battery or the whole laptop:
If the battery replacement cost is under 30% of a comparable new laptop, replace the battery.
Example: You have a 4-year-old Dell Latitude that still runs fine. A replacement battery costs $65. A new Latitude with similar specs runs about $900. That’s 7% — replace the battery. But if your laptop is 8 years old, the screen is cracked, and it takes 5 minutes to boot — a $100 battery is throwing good money after bad.
→ Detailed price breakdowns for 20+ popular laptop models: Laptop Battery Replacement Cost Guide: Dell, HP, Lenovo & ASUS Compared.
6. How to Replace a Laptop Battery (The Universal Steps)
Every laptop is slightly different, but the overall process follows the same pattern. Here’s the universal workflow with safety checkpoints at each stage.
Pre-Flight Checklist
| Item | Why |
|---|---|
| Phillips #0 or #00 screwdriver | Most laptop screws use this size |
| Plastic spudger / pry tool | Releases clips without scratching or shorting anything |
| Anti-static wrist strap (optional but recommended) | Prevents static discharge from damaging components |
| Small container or magnetic mat | Keeps screws organized — some are different lengths |
| Your new battery | Double-check the part number before you start |
The 7 Universal Steps
Step 1: Power down completely. Not sleep, not hibernate — full shutdown. Unplug the AC adapter and all peripherals.
Step 2: Drain residual power. Hold the power button down for 15 seconds. This discharges capacitors on the motherboard — reducing the risk of a short circuit when you disconnect the battery.
Step 3: Remove the bottom cover. Flip the laptop over. Remove all screws from the base — note their positions, because some may be longer than others. Insert a plastic pry tool into the seam between the bottom cover and chassis. Work your way around the perimeter until all clips release. Lift the cover off carefully.
Step 4: Disconnect the battery cable from the motherboard FIRST. This is the most important safety step. Before you touch anything else inside the laptop, locate the battery connector on the motherboard and gently disconnect it. Use a plastic spudger — never metal. Push from the connector body, never pull the wires.
Step 5: Remove the old battery. Remove the screws securing the battery (typically 3–6 screws). Lift the battery out. If it’s stuck, check for missed screws — don’t force it. Some batteries have a pull-tab or adhesive strips underneath.
Step 6: Install the new battery. Align the new battery with the screw posts. Press it gently into place — it should sit flush. Replace all battery screws (snug, not overtightened). Reconnect the battery cable to the motherboard — press firmly until it’s fully seated.
Step 7: Reassemble and test. Align the bottom cover and press around all edges to snap the clips back in. Replace all screws. Plug in the AC adapter (some new batteries ship in “shipping mode” and won’t power on until plugged in first). Power on. Check that the battery is detected and charging. If it’s not recognized, see section 7.
Built-In vs Removable: What Type Do You Have?
If your laptop has a release latch or slider on the bottom, the battery is external and removable — the whole swap takes 30 seconds. If there’s no latch, the battery is internal and requires the full disassembly process above.
Most laptops made after 2015 have internal batteries. Some business-class models (certain ThinkPads, Latitudes, EliteBooks) still use external batteries. Gaming laptops are almost always internal — they use higher-voltage packs that need to be secured inside the chassis.
→ Detailed brand-specific replacement guides and a difficulty rating system: How to Replace a Laptop Battery — Full Step-by-Step Guide. And if you’re not sure whether your battery is user-replaceable: Built-In vs Removable Laptop Batteries: DIY Difficulty Guide.
7. New Battery Won’t Charge? Start Here
You installed the new battery, plugged in the charger, and… nothing. Or it says “plugged in, not charging.” Don’t panic — this is common and usually fixable.
The 5 Most Common Post-Install Problems
| Symptom | Most Likely Cause | Fix |
|---|---|---|
| Laptop won’t turn on at all | Battery in shipping mode | Plug in AC adapter — many new batteries require first charge via adapter before they’ll power the laptop |
| “Battery not detected” | Connector not fully seated | Shut down, reopen, disconnect and firmly reseat the battery connector |
| “Plugged in, not charging” | Charge threshold enabled | Check Dell Power Manager, Lenovo Vantage, or ASUS MyASUS — charge may be capped at 60–80% |
| Battery detected but won’t charge past 0% | BMS needs reset | Perform an EC reset: shut down, remove battery, hold power button 30 seconds, reinstall, reboot |
| Battery percentage jumps erratically | BMS needs calibration | Run a full calibration cycle (see section 8) |
Brand-Specific Charge Threshold Settings
| Brand | Tool | Where to Find It |
|---|---|---|
| Dell | Dell Power Manager | Pre-installed on most Dell laptops; check Battery Information → Settings → Charge Mode |
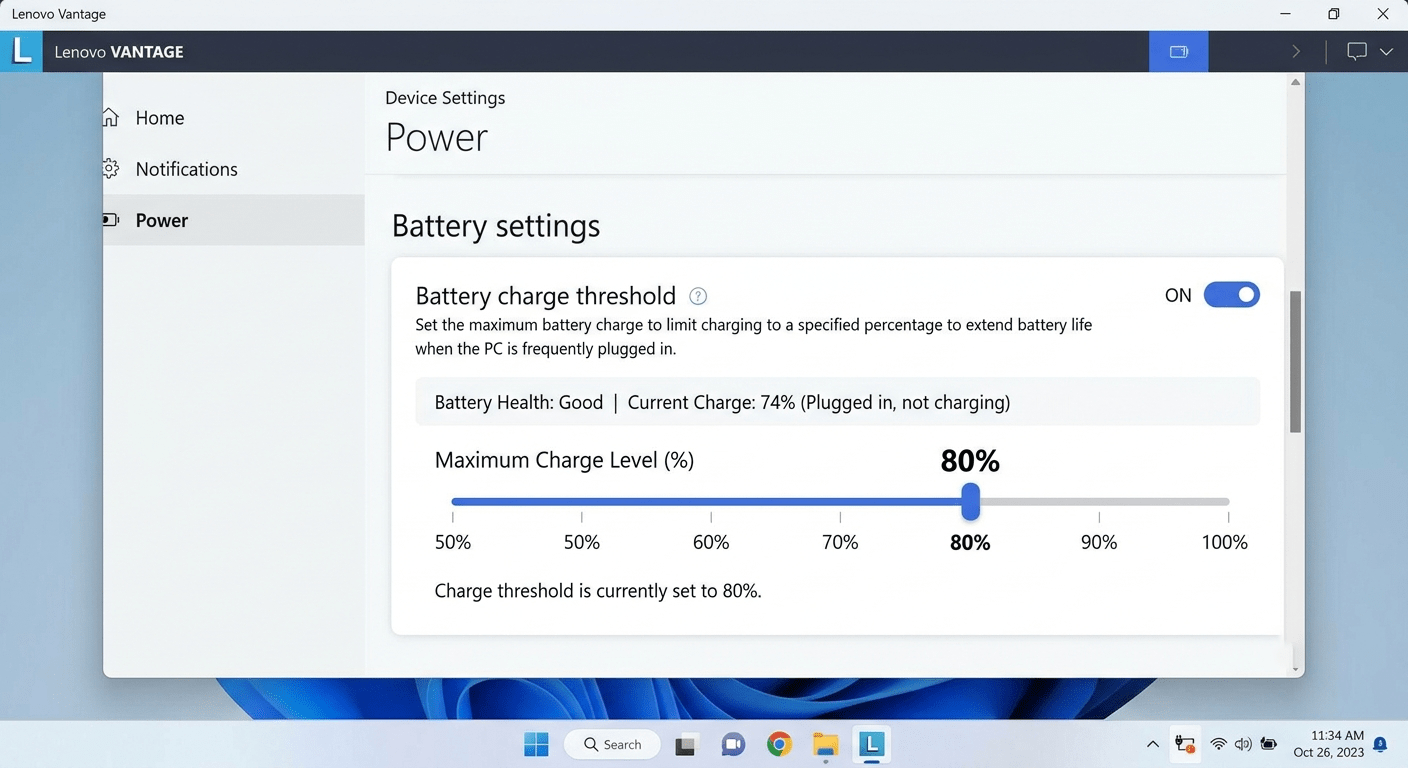
| Lenovo | Lenovo Vantage | Device → Power → Battery Charge Threshold. Also check Conservation Mode in BIOS |
| ASUS | MyASUS | Customization → Battery Health Charging — may be set to 60% or 80% max |
| HP | HP Support Assistant | Check battery care settings; some EliteBook models have BIOS-level charge limits |
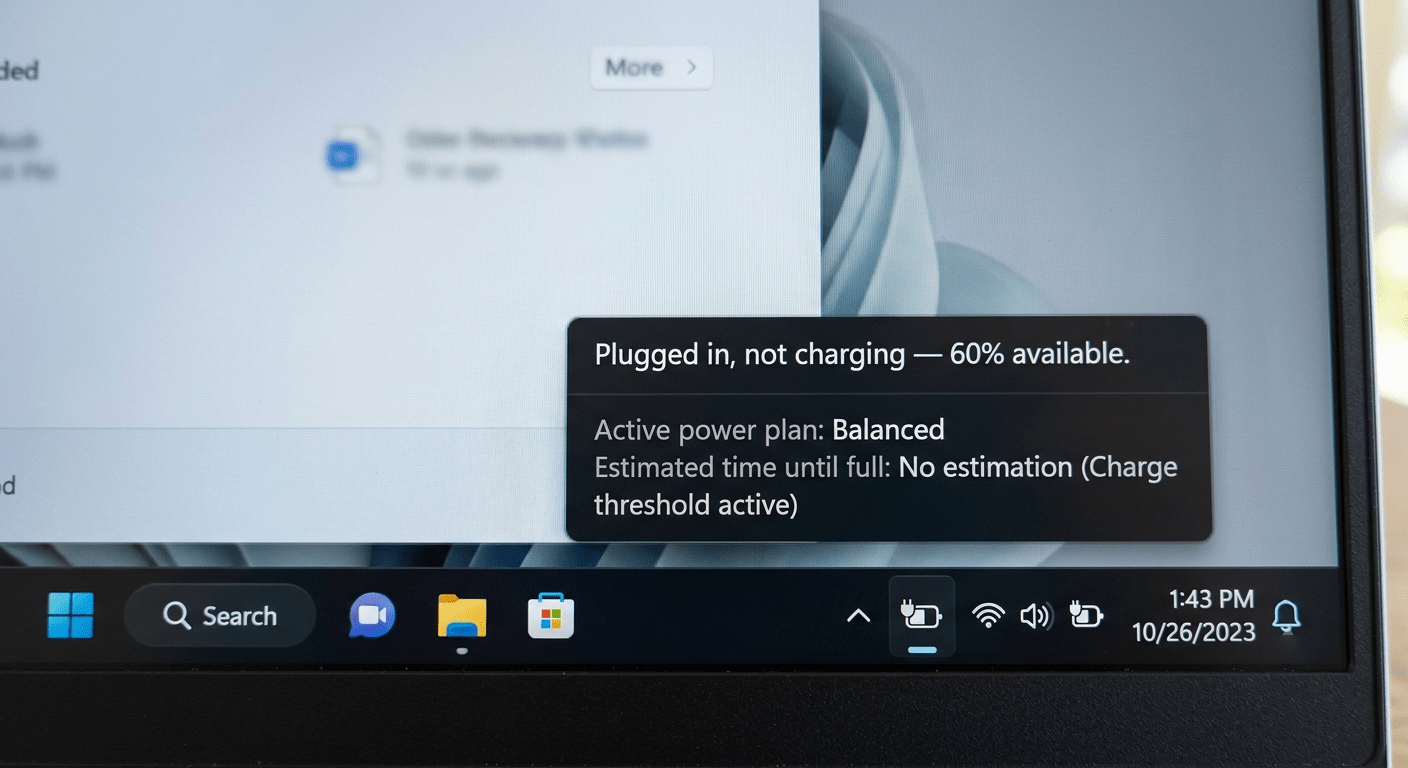
If none of these fixes work, try updating your BIOS and chipset drivers from the manufacturer’s support site. In rare cases, a firmware incompatibility prevents the new battery from communicating with the laptop. If you’ve exhausted every software fix, the battery itself may be defective — contact the seller for a warranty replacement.
→ Full diagnostic flow with step-by-step screenshots: Laptop Battery Not Charging? 8 Fixes That Actually Work.
8. New Battery Calibration (First Charge Done Right)
A new battery needs calibration so your laptop accurately reports the charge level. Skip this and you might see the percentage jump from 40% to 5% in two minutes — or shut down while still showing 20%.
The 5-Step Calibration Procedure
- Charge to 100%. Plug in the charger and let it reach 100%. Keep it plugged in for at least 2 more hours after reaching full — this ensures every cell is fully topped off.
- Disable power-saving features. Set your power plan so the laptop never sleeps or hibernates on battery. Disable low-battery warnings. You want an uninterrupted discharge.
- Discharge to 0%. Unplug and use the laptop normally until the battery drains completely and the laptop shuts itself off. Don’t plug it back in yet.
- Let it rest. After shutdown, wait at least 5 hours before plugging it back in. This lets the battery voltage settle so the BMS can read the true “empty” state.
- Recharge uninterrupted to 100%. Plug in and charge all the way back to 100% without using the laptop during charging. Once full, repeat the full cycle 1–2 more times for maximum accuracy.
Brand Shortcuts
Some manufacturers include built-in calibration tools that automate the process:
| Brand | Tool | Where |
|---|---|---|
| Dell | Battery Calibration | BIOS (F12 at boot → Diagnostics → Battery) |
| Lenovo | Battery Gauge Reset | Lenovo Vantage → Device → Power → Battery Gauge Reset |
| HP | Battery Check / Calibration | HP Support Assistant or BIOS (Esc at boot → F2 → Component Tests → Battery) |
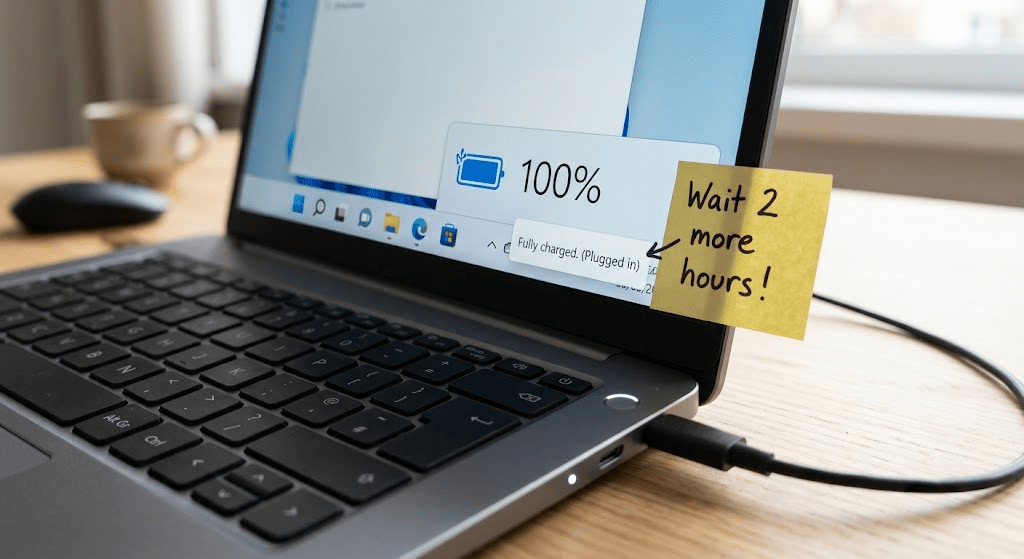
→ Complete calibration walkthrough with model-specific notes: New Laptop Battery Calibration: First Charge & Setup Guide.
9. Make Your New Battery Last
You just spent $40–$150 on a new battery. A few simple habits will help it last years instead of months.
The 20–80% Rule
Lithium-ion batteries degrade fastest at the extremes — fully charged (100%) and fully discharged (0%). Keeping your battery between 20% and 80% significantly extends its lifespan. This isn’t about daily runtime — it’s about how many years the battery lasts before it needs replacing again.
Most manufacturers now include charge-threshold settings that automate this:
| Brand | How to Set Charge Limit |
|---|---|
| Dell | Dell Power Manager → Battery Information → Settings → Custom → set 50–80% |
| Lenovo | Lenovo Vantage → Power → Battery Charge Threshold → set upper limit to 80% |
| ASUS | MyASUS → Battery Health Charging → Balanced Mode (caps at 80%) |
| HP | HP Support Assistant or BIOS (varies by model) |
Heat Kills Batteries — Here’s What to Avoid
| Bad Habit | Why It Hurts | What to Do Instead |
|---|---|---|
| Using laptop on a bed, blanket, or pillow | Blocks air vents; internal temps can exceed 95°F (35°C) | Use on a hard, flat surface — a $15 laptop stand helps airflow |
| Leaving laptop in a hot car | Cabin temps can hit 140°F+ in summer — permanent chemistry damage | Take it with you or leave it at home |
| Gaming on battery power | High current draw + heat generation accelerates wear | Plug in for heavy tasks; use battery for light work |
| Using a cheap, under-wattage charger | Insufficient power causes the battery to supplement — cycling it unnecessarily | Use a charger that matches or exceeds the original wattage |
Quick Wins for Longer Daily Runtime
- Lower screen brightness — the display is the #1 power drain. Drop it to 50–70%.
- Enable Battery Saver — Windows Settings → System → Power & Battery → turn on at 30%.
- Close background apps — Ctrl+Shift+Esc → sort by power usage → close what you don’t need.
- Turn off keyboard backlight when not needed — or shorten the timeout to 10 seconds.
- Drop refresh rate to 60Hz when on battery — 120Hz/144Hz panels use significantly more power.
→ 15 proven battery-saving tips with Windows settings deep-dive: How to Extend Laptop Battery Life — Tips That Actually Work.
10. Safety: What If Your Battery Is Swollen?
How to Spot a Swollen Battery
- Keyboard or trackpad is bulging upward
- Laptop wobbles on a flat surface (the case is warped)
- Case seams are separating or gaps have appeared
- Screen doesn’t close flat anymore
- A faint sweet or chemical smell from the vents
What to Do Immediately
- Stop using the laptop. Power it off. Unplug the charger.
- Let the battery drain. Do not charge it again.
- Do not poke, press, or puncture the swollen area.
- Store the laptop in a cool, dry place away from flammable materials — ideally in a metal container or on a concrete surface — until you can have it serviced.
- Have the battery replaced by a professional unless you have experience handling damaged batteries. Many repair shops will handle swollen batteries as a standard service.
Disposal
Never throw a lithium battery in the trash. Most electronics retailers (Best Buy, Home Depot, Staples) have free battery recycling drop-offs. For swollen batteries, call ahead — some locations require special handling kits.
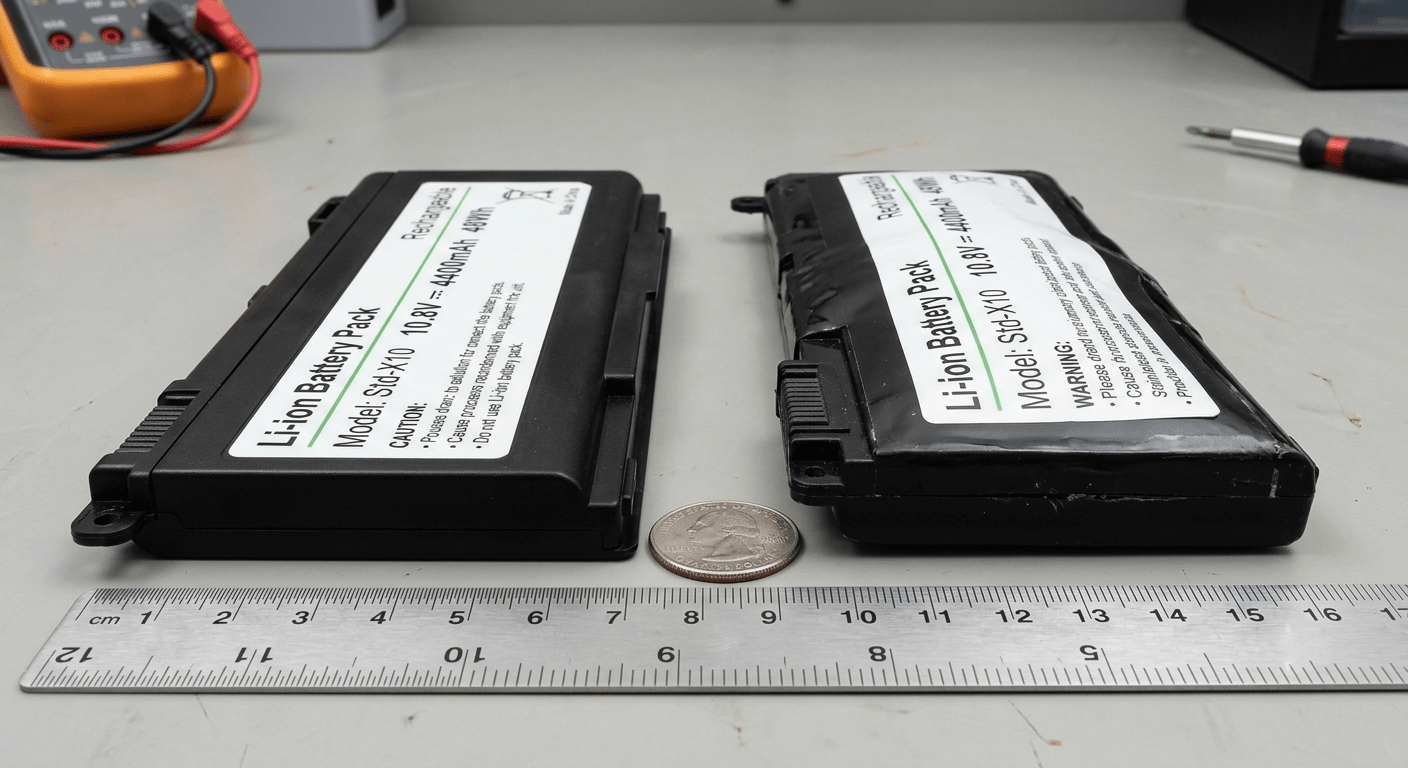
→ Full emergency procedure and prevention tips: Swollen Laptop Battery: Danger Signs & Emergency Guide.
11. Internal vs Removable Batteries: Can You DIY This?
Not all laptops are equally DIY-friendly. Before you order a battery and a screwdriver set, figure out what you’re dealing with.
Quick Test
Flip your laptop over. Do you see a battery release latch or a removable battery panel? If yes — you have an external battery and the swap takes 30 seconds. If the bottom is a solid panel with screws — you have an internal battery.
Difficulty Tiers
| Tier | Type | Typical Models | DIY? |
|---|---|---|---|
| 🟢 Easy | External battery with release latch | Older ThinkPads (T480 and earlier), some Dell Latitudes, older HP EliteBooks | Yes — no tools needed |
| 🟡 Moderate | Internal battery, screw-mounted | Most modern laptops — Dell Inspiron, HP Pavilion, Lenovo IdeaPad, ASUS VivoBook | Yes — with screwdriver, pry tool, and 15–30 minutes |
| 🟠 Hard | Internal, clipped or partially glued | Some ultrabooks, older MacBook Air, ASUS ZenBook | Proceed with caution — watch a model-specific video first |
| 🔴 Professional Only | Fully glued battery, or swollen | Microsoft Surface, recent MacBook Pro, any swollen battery | No — pay a professional. The risk of puncture and fire is real. |
I tell people this: if you’ve never opened a laptop before and yours is in the “Moderate” tier, watch a YouTube teardown of your exact model first. If what you see makes you uncomfortable, there’s no shame in paying a shop $49. A botched DIY job costs more to fix than professional installation.
→ Difficulty ratings for 30+ popular laptop models: Built-In vs Removable Laptop Batteries — A DIY Difficulty Guide.
Frequently Asked Questions
How do I know if my laptop battery needs replacing?
Your laptop dies suddenly at 30–50% charge, runtime has dropped under 2 hours, the battery report shows under 70% of original capacity, or the case is bulging. Any one of these is a strong signal. Two or more — it’s time.
How long do laptop batteries typically last?
2 to 5 years, or 300 to 500 charge cycles — whichever comes first. Heavy users (daily full discharges) tend toward the lower end. Light users who keep their laptop plugged in at 80% charge can get 4–5 years.
Can I replace my laptop battery myself?
For external batteries with a release latch — yes, it takes 30 seconds. For internal screw-mounted batteries — yes, with basic tools and 15–30 minutes. For glued-in batteries (Surface, MacBook) — professional replacement is strongly recommended.
How much does a laptop battery replacement cost?
OEM batteries: $55–$170. Quality third-party: $30–$100. Professional installation adds $40–$100. The exact price depends on your laptop brand, model, and battery capacity.
Are cheap third-party batteries safe?
Cheap no-name batteries ($15–$25) often lack proper safety certifications and a full BMS — they carry a real fire and swelling risk. Quality third-party batteries with CE/RoHS/UL certifications and a 1-year warranty are a reasonable middle ground.
Is it bad to leave my laptop plugged in all the time?
Keeping a battery at 100% constantly accelerates aging. If your laptop stays plugged in most of the time, set a charge limit to 60–80% using your manufacturer’s power management tool. This can add 1–2 years to the battery’s usable life.
How do I check my laptop battery health?
On Windows, open Command Prompt as Administrator and run powercfg /batteryreport. Open the saved HTML file and compare Design Capacity to Full Charge Capacity. macOS: Apple menu → About This Mac → System Report → Power → Health Information.
What should I do if my battery is swollen?
Stop using the laptop immediately. Unplug it. Let the battery drain. Do not poke or press the swollen area. Store it in a cool, dry place away from anything flammable. Have the battery replaced by a professional — a swollen battery is a fire hazard.
How do I find the right replacement battery for my laptop?
Match the exact part number printed on your original battery — not just the laptop model. One laptop model can ship with several different batteries. The part number is on a white sticker on the battery itself.
What tools do I need to replace a laptop battery?
For internal batteries: a Phillips #0 or #00 screwdriver, a plastic spudger/pry tool, and optionally an anti-static wrist strap. For external batteries: nothing — just slide the latch.
How do I calibrate a new laptop battery?
Charge to 100% and leave it plugged in 2 more hours. Then disable sleep/hibernate settings and use the laptop until it drains to 0% and shuts off. Wait 5 hours. Recharge uninterrupted to 100%. Repeat the cycle 1–2 more times for best accuracy.
Does voltage matter when buying a replacement battery?
Yes — voltage must match. 10.8V and 11.1V are interchangeable (both 3-cell Li-ion). But a 14.8V battery cannot replace an 11.1V battery — it could damage the charging circuit. When in doubt, match the exact voltage on your original battery’s label.
References & Sources
- U.S. Consumer Product Safety Commission (CPSC) — Lithium-ion battery safety data and fire incident statistics.
- UL Standards & Engagement — UL 2054 and UL 1642 safety standards for lithium battery testing and certification.
- U.S. Environmental Protection Agency (EPA) — Household battery disposal and recycling guidance.
- Microsoft Support — Windows battery report generation via powercfg command.
- IATA Lithium Battery Guidance — Transportation safety standards for lithium batteries, including UN 38.3 testing requirements and 100Wh carry-on limit.
- Dell Support — Official battery specifications, replacement procedures, and Dell Power Manager documentation.
- Lenovo Support — Battery charge threshold documentation for Lenovo Vantage and ThinkPad models.
Ready to Replace Your Laptop Battery?
Browse batteries for Dell, HP, Lenovo, ASUS, Acer, Samsung, and more — all backed by a 1-year warranty.
More from Our Laptop Battery Guide Series
- How to Find the Correct Laptop Battery by Part Number
- Laptop Battery Voltage, mAh & Wh Explained Simply
- Laptop Battery Replacement Cost Guide
- OEM vs Aftermarket Batteries — Updated Guide
- Swollen Laptop Battery: Danger Signs & Emergency Guide
- How to Replace a Laptop Battery — Step-by-Step
- Laptop Battery Not Charging? 8 Fixes
- How Long Does a Laptop Battery Last?
- How to Extend Laptop Battery Life
- New Battery Calibration Guide
- Built-In vs Removable Batteries Guide